First Run of MX
First run of MX
This Wiki page does not explain how to install MX, please see MX on Linux, MX on Windows OS, as appropriate.
This Wiki page describes how to use the Configuration Wizard that was added to MX as part of the changes for Release 3.12.0 - build 3141 (Thursday 29 July 2021). That replaces earlier instructions in MX Administrative Interface page, and what was previously included on Cumulus.ini Wiki page.
What you see on the first start of MX
The key fact relevant here is that no Cumulus release distribution contains a Cumulus.ini file.
So when you first use the software, you will need to use the settings pages in interface to enter all settings, and that will lead to creation of the main configuration file. Rather than work through several different pages, and all the settings available, you can just work through the essential settings to get MX working using the new Configuration Wizard page introduced in 3.12.0.
If you start Cumulus MX without a configuration file, and you have a screen attached so you can see the output from the engine, in release 3.12.0 and later releases you will see this:

As you can see, MX has actually started running, but it does not know what station type, so it cannot connect to any weather station, and MX will not do anything more.
You may wish to consult Cumulus.ini Wiki page to gain further understanding of any settings mentioned in the Wizard as you work through the various stages as described below.
Creating a "Cumulus.ini" file
For more information on IP address, and viewing the interface pages, see How_to_see_and_use_the_Admin_Interface.
- Open the Wizard page in interface.
- You can EITHER follow instructions seen in above image and type
http://localhost:8998/wizard.htmlin the URL box of your browser (replace "localhost" by the IP Address of your CumulusMX computer if you need to). - OR just type in
http://localhost:8998/in the URL box of your browser (replace "localhost" by the IP Address of your CumulusMX computer if you need to), this displays the Dashboard web page, now select Settings menu, and then from the drop-down select Config Wizard:
- You can EITHER follow instructions seen in above image and type
- The following screen will open
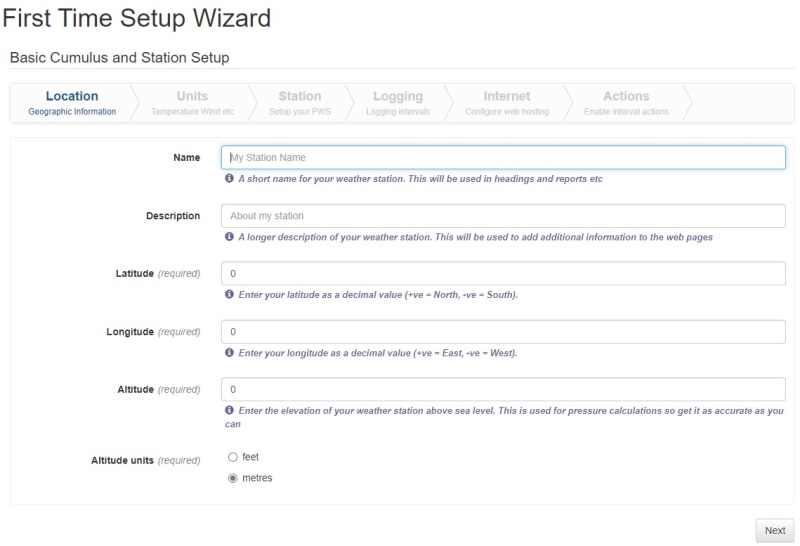
- This is the First Time Setup Wizard which will lead you through the 6 steps that are the minimum requirements to get station up and running with CumulusMX. There is a Next button at the bottom of the page that will take you through these steps. However, the Next button will allow you to move on even though some fields have not been completed. This is not a good idea, however, as CumulusMX will not function correctly if you do not enter these fields so DO NOT click on Next until all the fields on a Wizard page are completed. This is especially true of the Latitude and Longitude settings and the Unit settings. Please make sure that the Unit settings are what you want to use as once set they CANNOT be changed without causing major problems.
- Location = Your Station name and description, your latitude and longitude (in decimal format (Google Maps provides this if you pin your location), and your height above Sea Level in feet/metres.
- Units = The units you are going to use for Temperature, Wind, Pressure and Rain. As stated these cannot be changed after their original settings as it will render all CumulusMX stored data invalid, so make sure you set them correctly.
- Station = Select a Station type from the drop-down box. It is important to get this correct as failure to do so will result in CumulusMX being unable to find your Weather Station.
- The additional settings that are displayed to you, once you have set your station type are pertinent to the station type you have selected (and vary depending on MX release), so there is not a screenshot to show you the other settings for your station type.
- Logging = This is frequency that CumulusMX will store data in the log files. It defaults to 5 minutes but may be changed to other values by clicking on the dropdown. This is also where you set the data Rollover Time to either 9am or Midnight which tells CumulusMX when you consider your end of metrological day processing should take place.
- Internet = Local Copy or FTP. Local copy assumes you are running your own Internet Web Server on which you will host your own or the default web site and when you click on it a path field will open up so you can tell CumulusMX where to put your files. FTP assumes you will be using a Hosting Company (most people use this option) for your Web Site and once you click on FTP further fields will open up and it is here that you put the details given to you by your Hosting Service in order to FTP the web files to your Web Site. You can set both if you wish but be aware of the extra load that this may impose on your CumulusMX computer.
- Actions = This where you set the time intervals for Cumulus MX to upload standard file and realtime files to your Web Host.
- Standard files are the data files required if you want to use default web site and they can be generated at what is called the Normal Interval, a multiple of minutes, which is set in the Normal Interval box (default 15 minutes). To enable generation you click on the first box, but if you want these files to be file transferred to an external Web Host then click on the FTP box as well.
- Real time data files are those required to run features on your web site like the Gauges and they are generated at the realtime interval which is defined as a number in seconds. To enable generation you click on the first box, but if you want these files to be file transferred to an external Web Host then click on the FTP box as well. (Unlike the legacy software where this was timed from end of one upload to start of next, for MX this is time between start of one generate and start of next, so please don't set it below 5 seconds unless you are sure that the files can be generated, and the FTP task can start and finish within that time interval). The right setting depends on the speed of your Internet connection and the response of your Web Host. The default is 30 seconds.
- At this point you have set up the minimum settings to get CumulusMX up and running and you will notice that what was labelled as the Next button has changed to being labelledAll Done. When you click on this:
- your initial Cumulus.ini file will be saved
- a popup will appear on your Browser saying the Station Type has changed - restart required
- and an additional line will appear in the terminal window saying the Station Type has changed - restart required.
- This is the First Time Setup Wizard which will lead you through the 6 steps that are the minimum requirements to get station up and running with CumulusMX. There is a Next button at the bottom of the page that will take you through these steps. However, the Next button will allow you to move on even though some fields have not been completed. This is not a good idea, however, as CumulusMX will not function correctly if you do not enter these fields so DO NOT click on Next until all the fields on a Wizard page are completed. This is especially true of the Latitude and Longitude settings and the Unit settings. Please make sure that the Unit settings are what you want to use as once set they CANNOT be changed without causing major problems.
- Before you do that restart, you can optionally use Samplestring.ini file as a guide to create a strings.ini file where you can tailor a number of texts that Cumulus produces. (Look up the cross references, if you want to do this now, but you can leave it to later)
- The advantage of creating your strings.ini file now, is that it is read when MX starts, and we will shortly restart MX.
- Closing MX is required because it is only when MX is newly started that it can pick up main configuration file you created in the Wizard, and then find a connection to your Weather Station.
- MX must be stopped correctly, because it has to do a number of actions after it receives a request to close:
- If you have a screen attached to the device running the MX engine, you can click in that screen and terminate Cumulus MX by typing C while holding down the control key (or equivalent if you are using an apple mac).
- If you are connecting to MX from a remote device, then type into that remote session the control C if your terminal software can pass that to MX.
- Otherwise do whatever is needed to end the MX executable on your installation.


Restart MX
Restart Cumulus MX.
MX will read your new settings (in Cumulus.ini and if it finds the optional strings.ini file it will read that too)
MX will connect to the weather station, and start reading the weather data from it. On this first access to your weather station, it will not read any archive data (there is a way to modify today.ini so it can read what is in the separate logger), but from now (until you stop it) it will read (and from time to time log) the live data while MX remains running.